Tools & Fixtures
Although Guitars can be made with common woodworking tools, there are a few specialized tools that make the process a bit easier. This page has just a few of the tools and fixtures that get used in the shop.
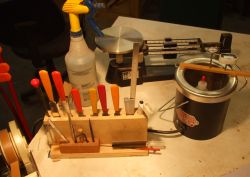 |
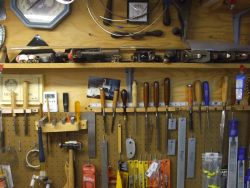
To the left is nothing too exciting, but they are tools that John reaches for almost every day. Included are some special files, the hot hide glue pot, the triple beam balance, and a few other things. |
Over one of John's benches are many of his carving, straight edges etc. Still nothing that is too out of the ordinary, but there are a couple of specilized things in there. For example the kidney shaped tool with the 2 holes in it located in the lower center of the picture is a 'special scraper' that John got from Alan Carruth who had these made up special. This a great tool for scraping the re-curve on mandolins and archtops. |
|
|
Since John's buys most of his fretwire in 100 foot rolls, it basically is already formed in a nice curve that makes the frets fit nicely onto the radiused fretboard. On occasions, he will have some shorter lengths of wire, that usually come in short straight lengths. This little roller fixture does a nice job of putting a gentle curve in the straight fretwire. |
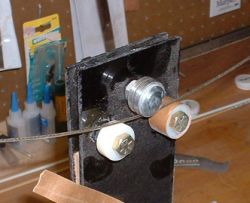
Here is an aluminum fixture with some drill bushings at just the right locations for putting in bridge pin holes in a blank. Metal dowel pins locate the side of the blank to 'just the right location' and the a 'spoil board' is clamped to the bottom to avoid any chipout. John has 4 of these fixtures made up for 2-3/16", 2-1/4" (most popular,) 2-5/16" and 2-3/8" bridge pin spacing. Of course he can do other spacings on special requests, but these are the most requested spacings. |
|
|
Here is another little drill fixture. This is used on 12 stings where John use's posts to capture the octive strings. Based partly on the pinless bridges of Mike Doolin, John has drawn lots of inspiration from Mike over the years. Once the bridge is located, the post holes can be accuratly drilled through the top and bridge plate making a perfect fit for installation. |
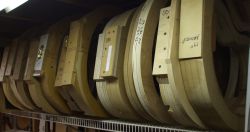
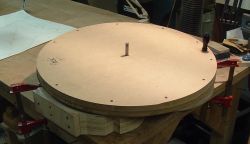
Molds help to keep the correct outline of guitar during construction. Here are a bunch of molds that John has. He has been 'upgrading' his molds and although he keeps them rather simple, John has worked hard to make sure that everything is 'indexed' properly. While special requests for different body shapes are accepted though the Custom Series, John would probably make a new mold even for a single special order. |
 |
 |
Side bending is done primarily using the Fox style side bender, although a certain amount of side bending is still done by hand over a hot pipe. |
Here is a look at a JS model getting the top glued on. Many builders prefer to glue the backs on first because that allows them to really clean-up and glue squeeze-out the might be seen through the sound hole. While that is valid, John does the top first for a couple of reasons, the primary reason being that he can make adjustments to the 'tuning' of the top after it is attached to the rim. |
|
|
You often hear, "you can never have too many clamps," when talking about tooling up for lutherie. Here you can see a resonator ring getting its kerfing glued on. There are a couple clamps being used in the application. |
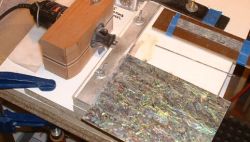
This is a mini table saw that was put together for cutting abalone into strips. It works quite well although the Dremil tool is a little under powered. |
|
|
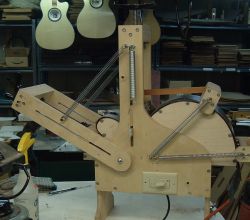
Here is a binding jig based on work done by Harry Fleishmanand his friend Dennis Stevens. Getting the binding channels cut accurately is a challenge but this fixturing make the process much easier. |
Here is another look with a side view of the binding jig. Here you can see the heart of the fixture the paralellagram that keeps the laminate trimer perpindicular to the table as you move around the body of the guitar. At a New England Luthiers meeting, Don William's showed his take on the fixture. Don added a drawer slide and lazy susan bearing and this is what was used on John's fixture. |
|
|
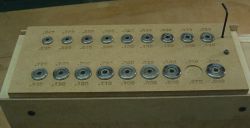
Here are the different bearings used for setting the different depths of the binding channels. This little holder certainly makes finding the right bearing a little easier than keeping them in a pile. |
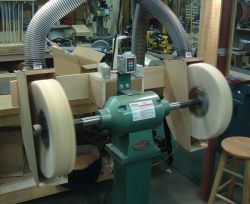
Here is Buffy. She is a 3HP, 3 phase beast with 18" wheels. "I love this thing. It runs so smoothly and the speed control allows you to be aggresive without generating heat. I hear a lot of guys say they like to have a small motor on their buffer so that it will stall before burning through. I don't quite get that reasoning. I like being able to control the speed (therefore the heat) yet still have the power to lean into the wheel. The buffer should 'cut' not burnish. |
|
|
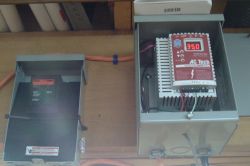
Here is the Buffer's Variable Frequency Drive, (VFD) that allows for speed control. There is a little keypad on the buffer that allows you to dial in the speed and keeps the VFD control safely away from the buffer and the dust. |
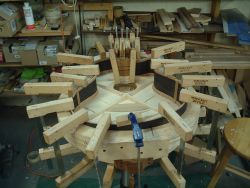
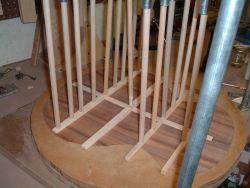
Here is a look at the go-bar deck. Here a koa back is getting 2 of 4 of its back braces glued up. The round 'dish' has a sperical dip in it with a 15 foot radius. Although John uses a subtle spherical backs on most of his guitars, the Vintage Series use a slightly different approach. They are more like a barrel shape with the radius of arc from top to bottom larger (less arch) than across the sides. John is working up some articles on what worked for him using the go-bar deck and hope to post that information a little later on. |
|
|
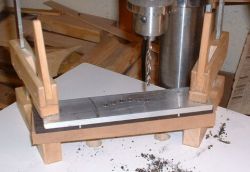
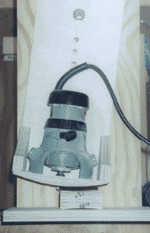
Sometimes we need to make tools that make tools. Here the router is swung in pendulum fashion to make a hardwood radius plane, used to help in the profiling of fingerboards. You can see the material being fed through (staight outward in this view) and the router will make a cut at the radius set by the rotational point held in place by the bolt. |
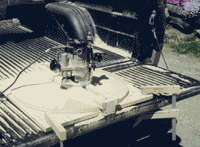
Some jobs are just better done outside. Here we are making a spherical dish that matches the domed shape of the back of a guitar. In this case the router was guided along a sled with the proper radius and the dish was index along the way. It is a dusty messy project that was done on this traveling workbench. |
 |
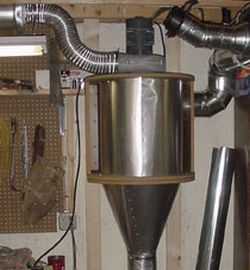 |
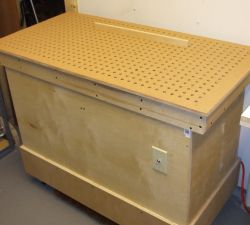
Here it the Tinman, a shop built cyclone dust collector. It is hooked up to the jointer, the table saw and a couple of other tools in the shop. In addition John has some other dust collection tools hooked up to his sander(s) and other tools. Dust is always an issue, but John continues working on shop upgrades that will help reduce the dust generated in the shop. For example the downdraft table should help with the dust generated by hand sanding. |
This is the downdraft table the John just recently put together. As a matter of fact, in the photos it has not even been used yet, but it seems like it should do a good job. The top is cork faced and the grid pattern will allow for 'stop-blocks' to be secured to the top. |
|
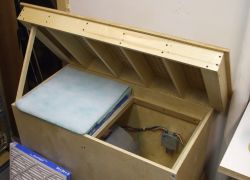 |
A look at the guts of the downdraft table with 2 of 4 filters removed. Underneath you can see the squarel cage fan enclosure and the electical. It is set-up with 2 speeds, although it will probably always be run on high. |
Here is look at the one of spherical dishes being used to cut a radius onto the rim of a guitar. The dish is faced with pressure sensitive adhesive (PSA) sandpaper. A fixture holds the dish in place while the black handle allow you to crank the dish. Some guys (and factories) have motorized versions of this, but if you profile the sides fairly close to begin with, it does not take too long profile the radius by hand. |
|
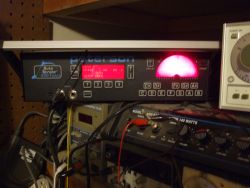 |
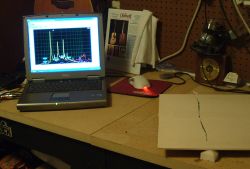
This is John's Strobe Tuner. It is a Peterson 490 that is a very accurate tuner and allows for very precise adjustment of intonation. Being a stobe tuner it can also 'see' very short duration resonaces which can be helpful in working with resonate frequencies of specific items. |
This is John's Laptop. Certainly a tool for many different things, but in this case its software makes it Spectrum Analyzer which is really useful to "see" what we are hearing. More information will be coming about the use of this tools and others when the Research Page gets a little more developed. |
|
There are some other tools and fixtures that didn't make it on this page yet. We will try to post others from time to time. Please stop back and take a look.